it's actually better than that title sounds. a few weeks ago i made the difficult decision, with the input of my doctor & support of Nacho, to have some genetic testing done. i'd been considering this for a couple of years, and finally made the leap. i'm sure any woman reading this can guess what it was - BRCA1 & 2 Genetic Test. my mother was diagnosed with breast cancer while in her early 30's. she elected to have a Radical Double Mastectomy at that time. consequently, i have been getting mammograms since i was about 29 - at the time the standard was to start mammograms 5 years sooner than your mother or sister were diagnosed; that standard has since changed to 10 i believe. let me cut to the chase, i tested Negative for both - ovarian & breast.
now, the rest of the story.....during a routine yearly exam, my doctor asked if i'd thought more about it & would consider getting tested. i told him i've always kinda felt that with my mom's diagnosis, i knew i was probably at greater risk than say someone who had no history in their family at all - i now know this to not be true at all. and also, so what? what if you test positive? what are you going to do about that? well, therein laid the issue - it was not the test that was scary, it was WHAT DO YOU DO WITH THAT INFORMATION?
so Nacho & i had some very lengthy discussions about it. i'm not one to live in ignorance. i have often said if ignorance is bliss, then i'm the happiest person you will ever meet. but not really. (1) i'm not a very happy person, ask anyone & (2) it's not so much that i'm ignorant as it is, i'm just not very bright. those aren't the same things are they? but i realized, i'd want to know. and as someone said to me during this, any information is GOOD information. so what if it comes back positive? at least you know what your options are. and what would you do? the 2 or 3 people that knew i was doing this asked as well. you have options. i would not hesitate to have my ovaries removed. i'm not having kids so that is a no-brainer. but would i have a Mastectomy? well, yes i would, but i wouldn't necessarily HAVE to. that was something i had not thought about. so this process was a good thing, because it allowed me to look at the multiple options available. i didn't have to think "radically". as my doctor told me, one path would be to have mammograms twice a year & not just standard mammograms, embrace some of the new technology in that area too. now, i wasn't so scared. and you know what? Nacho said it best: if i did have to "give up the girls" (my words not his), he'd rather have me here alive without them, than not! i'd be lying if i said i was pleasantly surprised or flattered. i was neither cuz i know exactly who i married! BOO-YAH!
but a couple of other factors that helped to make this decision for me: a friend from graduate school was diagnosed with Stage3 breast cancer a few weeks ago. Nacho posed the question that if i were to ask her right now if she would have had the test (i do not know if she ever has), what do you think she would say? he had a point. BUT, it's also important to note, a Negative result does not mean you will never get cancer, you just carry the same risk "as that of people in the general population." and that's important because i know someone else who tested negative for the BRCA1 & 2 & she was diagnosed with breast cancer last year. so again, i had to ask myself, what good is this test? and the best answer i could come up with is, as someone else put it......it's good information either way! and, of course, i simply cannot live my life without saying i tried to know and do all i could about this.
so here's how it worked for me (and this is by no means the way it might work for someone else): my doctor's office took a blood sample & sent it to Myriad. i will not provide a link to their site, you can Google it yourself & read all about the testing & controversy of this company's genetic patent on your own. that is a whole other issue i am in no place to tackle! as my doctor explained it to me, Myriad checks with your insurance to see if they will cover the testing. if they do, then Myriad proceeds with the testing. IF YOUR INSURANCE DOES NOT COVER THIS, Myriad contacts you, tells you so, & asks if you want to proceed with the testing, paying for it yourself. the cost is estimated at some $3000.00 USD give or take. i was fully prepared to pay this myself if necessary, but i decided to contact my insurance company to start with - hey, why wait? indeed they did cover it due to my family history. i got as much family history from my mom's side & my dad's as possible - my mom's case was the only known case on both sides. and that was that! blood taken, shipped, test run, results received from my doctor 10 days later = NEGATIVE!
i should be through the roof right? well, i guess knowing that there is no way to know anything for sure, that i could still find a lump or have a questionable mammogram tomorrow, well, it kinda takes the elation out of it for me. but i'm am glad i did it & grateful for the results given to me today. at least now i can say not only do i refuse to live in complete ignorance, but, should something happen, well, i did all that i could, given the tools currently out there, to find out what i could. and as more tools become available with technology, i'll use them when they are & i'm not afraid of what to do with the information!
Friday, October 21, 2011
Thursday, October 13, 2011
Flashback
i was pretty shocked when i looked back over the skimpy postings i've done in the past year+. i will not lie to you, everything kinda went downhill after i lost Butterz. so top that off with all the chaos that came with the Kitchen Remodel, and you have a perfect Depression Soup! wala! Ina would be proud. served up in beautiful bowls made by Apathy! mmm, sure am good tastin' ma! it was all a bit more than i bargained for!
so i'm going to try to get my buns (as Miss Millie would say) in gear & post all the stuff from this summer into October. they will be my Flashback postings! perhaps this will get me back on my track of more regular posting.
so i'm going to try to get my buns (as Miss Millie would say) in gear & post all the stuff from this summer into October. they will be my Flashback postings! perhaps this will get me back on my track of more regular posting.
Wednesday, October 12, 2011
Wine-OH!
one of my most favorite parts of our remodel is not the windows. it's not the countertops. it's not really even my faucet that i have promised to marry! IT'S MY WINE STORAGE! i think i've mentioned before that i went a little nuts with the whole "storage" idea in this remodel. if there was an empty space under or behind something, i wanted to find a way to use it. i did actually hold back when it came to all that blank space behind the seating in the banquette. you have to stop at some point or people are gonna think you really ARE crazy. i like to think i stopped just this side of crazy.
the first time i mentioned the wine storage was in my little Check List of items. i actually did finish it back in August. okay, the top steps are finished. and although i have not taken a true After photo, with the steps painted & all, here they are, or rather here they were in August!


now, cut your shelf liner to size. the easy way for me was to actually turn the drawer over & trace the bottom. perfect fit every time - except for the 1st one cuz i didn't think of it until after that!
 hold it down & peel it back as you go
 and there you have it! a nicely lined drawer!
 Spacers
since wine bottles vary in size, i didn't want to put anything too permanent in place where i might run into "accommodation" issues later. not that i can't drink my way out of any "accommodation" issues! but i wanted to leave a little wiggle room inside the drawer. to do that, i sized the drawer up by laying out a few bottles without everything being crammed bottle-to-bottle.
take 4 spare corks & hot glue 2 to each side, placing them close to the front & back of the bottles. i figured this keeps the bottles from clanging against the sides of the wood. i could have fit a 5th bottle in there, but, again, bottle sizes vary so i could run into issues down the road.
THIS IS JUST ON THE RIGHT & LEFT OF THE DRAWER! don't hot glue anything in between bottles. i considered & even tried cutting some corks in half lengthwise & whatever the other direction is. wine corks don't cut so well, & since i've had some pretty serious run-ins with sharp objects, i'm restricted on how much i'm allowed to use a knife (just you wait Nacho!). so it was just easier to use the whole cork & glue it in place on each side.
now just lay spare corks in between the wine bottles as you need them. i used 2 like the sides - 1 to the front & 1 to the back!
 and what's nice about this, is as i take a bottle out, if i don't have something to immediately take it's place, i just put a bunch of extra wine corks in the gap until i get replacement wine bought!
 and since i have extra space behind the bottles (to the back of the drawer), i just move the spare corks back there when i'm restocking the drawer. that way i always have extra corks right where i need them!
....and just wait! i have more ideas for all those corks! bwah ha ha!
the first time i mentioned the wine storage was in my little Check List of items. i actually did finish it back in August. okay, the top steps are finished. and although i have not taken a true After photo, with the steps painted & all, here they are, or rather here they were in August!

how cool is that?! keep in mind, these are the 2 sets of steps that separate the dining from the living room. and that's just the first step of storage. the step below that has drawers that are about twice as deep. so here's how i did it! oh, and forgive the pics, cuz, again, in a rush to get photos i used my phone & that's really not the best when you have the shakes from all that wine like i do!
- i used cork shelf liner (to carry the wine cork theme, but also for grip)
- Xacto knife or Box Cutter - aka Utility Knife apparently in the Mid-West!
- Ruler
- extra wine corks for spacers
- and of course WINE!!!
 |
| oh, & btw, that is an original Charles Chips can holding my spare corks. i have 2 of them thanks 2 mom! |
Assembly
make sure you have a clean drawer. i vacuumed it out & lightly sanded it.

Special Note: Nacho had to use the table saw & sander to the bottoms & front panel because i ended up adding thin felt strips to the bottom for glide - or else it scratched my beautiful Marmoleum floor. i found the felt strips at Hobby Lobby & it came in a sheet of 8.5 x 11, just like paper. even as thin as it was, this would affect the fit so he had to take a little off to make it work. this was trial & error so there were actually multiple trips to the sander & table saw before we got the bottoms & front whittled down so they didn't stick.


since wine bottles vary in size, i didn't want to put anything too permanent in place where i might run into "accommodation" issues later. not that i can't drink my way out of any "accommodation" issues! but i wanted to leave a little wiggle room inside the drawer. to do that, i sized the drawer up by laying out a few bottles without everything being crammed bottle-to-bottle.
 |
| anyone want to guess my current favorite wine? |
| dab of hot glue on the bottom of the corks |
now just lay spare corks in between the wine bottles as you need them. i used 2 like the sides - 1 to the front & 1 to the back!

....and just wait! i have more ideas for all those corks! bwah ha ha!
Monday, October 10, 2011
Diversion
just call us 92%. we get 92% of a project completed & move on to something else cuz, like so many people i know, you just get sick of dealing with it. if someone opened a business & called it The Last 8%, they'd make a killing. i will claim to be ADHD until that business opens. i am an idea person & a demo person. so i have had the idea for some time that my trusty garden fencing really needed to be replaced. Korby & i had worked hard a number of years ago to cut a sh*t ton of willow branches & make a nice looking fence out of them. and in tru Me fasion, this is the only pic i have of one section of it.
 taken at night of course with absolutely no patience for lighting, adjustments, etc. just the rush to get a before photo before i actually ripped it out. although i did find this one in the Gabion Wall files
 see it poking up in the foreground? this was a pretty intense project at the time. it has held up nicely through countless floods & has that rustic, organic feel to it. okay, nice & all, but time to move on. not long after Nacho finished our cable railing system, i found railing system made out of hog confinement wire - the same stuff we made our Gabions out of. he's lucky he got that cable railing done before i found it. but since then, i have wanted some sort of railing system made our of metal & the wire panels. tada!
tear the old out!


tear the old out!

and put in the new
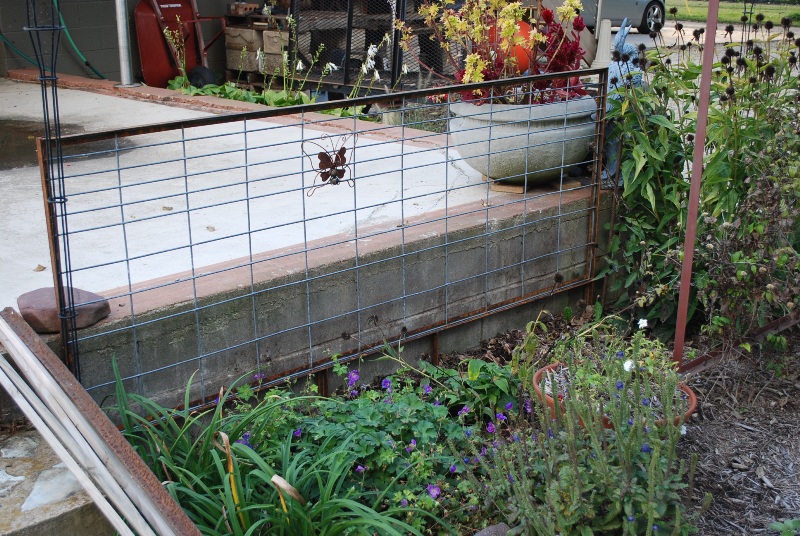
now believe me, it did actually hurt a little to tear all that willow out. a LOT of work went into putting it in place to begin with. but i like the clean look of this so much better. we're still working on the rest of the panels, but 2 panels in & i couldn't be more please!
Fall
we really have gotten more done than i've bothered to post here. i think i get worse & worse about taking photos then never posting any of them. so i needed a break from all that procrastination. Friday i took Baxter to Robinson Park for a really nice hike that frankly wore both of us out! so Saturday it was Nacho's turn to take me to Starved Rock State Park by boat!
We packed a nice little lunch of fried chicken, Gorgonzola potato salad, & cream filled cupcakes. well, there wasn't much cream filling to the cupcakes cuz i now need to buy a piping kit. we waited & fried the chicken right before we left & to keep it warm, we used the boat engine!
 and then just below Henry we saw an even bigger bird than the one we had keeping warm on the engine'


We packed a nice little lunch of fried chicken, Gorgonzola potato salad, & cream filled cupcakes. well, there wasn't much cream filling to the cupcakes cuz i now need to buy a piping kit. we waited & fried the chicken right before we left & to keep it warm, we used the boat engine!


sorry for the quality but he was quite a ways from us & i didn't want to disturb him. i only have 75-240mm lens as my long lens so this was the best i could get. anywho, after that it was just a lot of beautiful colors

of course we stopped off at Spring Valley Boat Club for a couple of Bloody Mary's. thanks for the hospitality Troglios! and then continued our trip up to SRSP. after an awesome lunch, we joined Tucker & locked through to visit Starved Rock Yacht Club. i'm still always amazed at the amount of height you cover in a lock. this is as the lock was filling up

and this is when it was full & we headed north to SRYC.

and even the change of seasons while you wait to lock through

ah, but the best was heading home

Barn Light Electric Giveaway
i found this giveaway courtesy of Rambling Renovators & couldn't pass it up! i did some searching on their site when we started the kitchen reno. and although we are pretty much finished on lighting, i have one place in particular where it is not the lighting i really want, but more of a place holder. so what better chance to try & fix that permanently?
i've seen this Orb style from other retailers & think it'd make a great permanent fixture for the island (no offense to my DIY pendants!)

and i love the industrial edge of this pendant

DO NOT EVEN GET ME STARTED cuz this is what i started looking at all along & inspired my DIY fixtures over the island that really came from here.

and then finally, i've looked at this one as a potential replacement for our entry stairway for some time.

so now that i've listed mine, here's how you can try for yours....
How to Enter:
i've seen this Orb style from other retailers & think it'd make a great permanent fixture for the island (no offense to my DIY pendants!)
and i love the industrial edge of this pendant
DO NOT EVEN GET ME STARTED cuz this is what i started looking at all along & inspired my DIY fixtures over the island that really came from here.
and then finally, i've looked at this one as a potential replacement for our entry stairway for some time.
so now that i've listed mine, here's how you can try for yours....
How to Enter:
- Look around online at Barn Light Electric and pick lights you’d love to own
- Feature your lighting picks on your personal blog, and link to the lights if you can!
- Copy/Paste these rules at the bottom of your blog article so others can enter
- Once your personal article is up, you must email your blog link to: contest@barnlightelectric.com to be qualified to win. The contest ends Wednesday, October 12, 2011
- Don’t have a blog? Find out how you can enter by reading the Official Rules
*I've confirmed that the contest is open to participants anywhere in the world over 18 years of age. If the winner is outside of the continental US, they will be responsible for any duties, taxes, fees, or additional shipping costs etc. that is associated with their country, as with any other order.
Thursday, September 22, 2011
and Happy 10th to me!
so this is what 10 years of commitment got me!

not bad eh? and i'll give him props, Nacho totally surprised me with this one! and no it is not a 1/19th model this time & it's not a rental. all mine!

not bad eh? and i'll give him props, Nacho totally surprised me with this one! and no it is not a 1/19th model this time & it's not a rental. all mine!
Wednesday, August 31, 2011
photo update
i did finally find some video that we shot of our surf trip last month down in FL. disregard the Tahiti reference, a typo on my part. whew! i thought we'd lost this forever. not bad for a first timer eh? sorry i couldn't get a tighter shot. we'll try harder next time!
Monday, August 29, 2011
have a seat!
we bought these stools not long after we bought the house 10 years ago. they never fit the counter that faced the river. your knees were always hitting the crazy piece of trim that ran across & underneath that counter. i hate them
 there's the crazy trim on the right! see how close the top of the stools are? we never did cut them down so sitting there was pointless.
so after we got the island in, we needed something to go on the end. we've looked at a few options for stools. lots of neat stuff at CB2, DWR, Crate & Barrel, etc. but i can't bring myself to get rid of these stools. so a few weeks ago, i found this
![]()
and knew i had a solution to our generic stools. so now this
 became this


so after we got the island in, we needed something to go on the end. we've looked at a few options for stools. lots of neat stuff at CB2, DWR, Crate & Barrel, etc. but i can't bring myself to get rid of these stools. so a few weeks ago, i found this
and knew i had a solution to our generic stools. so now this


with a minor Denacho twist. i wanted to create an unfinished feel to it. i'd considered a "dripping" effect on the legs, but just couldn't muster the attention span & patience to do that. instead, i just dragged the brush down & stopped when i felt like it. the scary thing is, i already owned the blue paint! i'd bought a sample can & used it in our hallway to paint one of the flood lines from 2009. i've only got 1 done & it's not poly'd yet - i had a little issue with that yesterday so sanded the poly off the top & had to repaint a coat of blue. i haven't decided if i want to tackle poly again. i don't have good luck with it. so i need to finish the other one & get them in place for a true After photo.
see? i don't actually HAVE to spend a bunch of $$ on everything in this remodel! btw, tours of the faucet are still gonna cost you $20/person.
IT'S HERE!!!
i had one of the most excruciating weeks of my life last week. a 6 day migraine that never let up. but you know what? even that couldn't squelch my excitement when this arrived
 yeah, i know this picture is totally blurry. i was so excited to snap it right out of the box, that i didn't bother to adjust light settings or anything. so excuse me for having priorities. i've been laboring over this one for some time & finally admitted, you can't....or rather shouldn't.....DIY everything. some thing are just best left to Payin' The Man! and this is one of them. it was a bit pricey ($45) but worth every penny cuz i went from this
 to this
 and now i feel like this
or something very close to that


or something very close to that
Subscribe to:
Posts (Atom)