we seem to have the WebCam working for now. that is until i break it again. so you can view the pic here where you'll have to refresh the page for updated photos, or you can view it back at the old DeNacho site where it auto refreshes every minute....until it breaks again!
oh, and the web cam photo does not appear to work in Chrome browser. i think it's an inline frame thing. so if you use Chrome like i do, it could be hit or miss.
Saturday, April 30, 2011
Friday, April 29, 2011
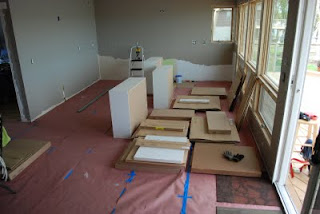
hey my kitchen is in!
it's in the bathroom
it's in the living room
it's in the laundry room
it's in the garage
and now it's in the kitchen
 oh, you didn't think i mean IN IN did you? i forgot to mention...
it's in the office/Moser's bedroom too cuz now most all the flat packs are upstairs, so, they too are spread out everywhere. now would NOT be a good time to flood!
it's in the living room
it's in the laundry room
it's in the garage
and now it's in the kitchen

it's in the office/Moser's bedroom too cuz now most all the flat packs are upstairs, so, they too are spread out everywhere. now would NOT be a good time to flood!
Thursday, April 28, 2011

Wednesday, April 27, 2011
roll 'em if you got 'em
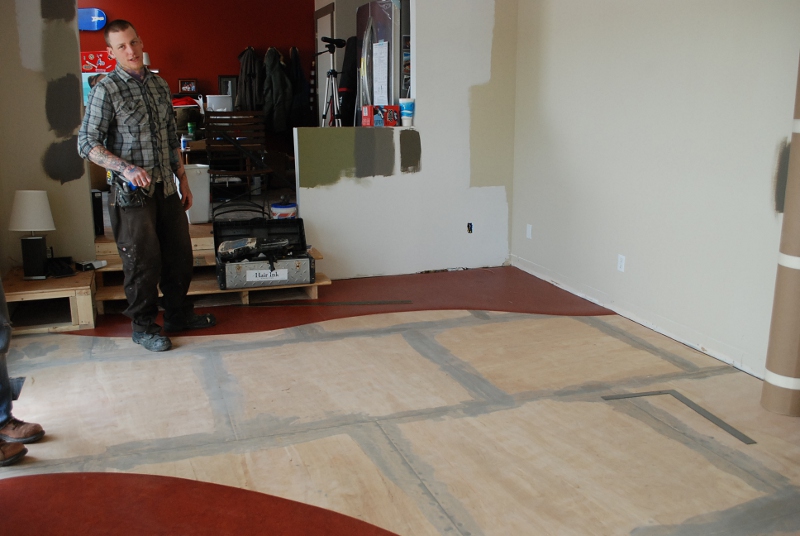
due to some crappy cheap paint we bought last week, we had to repaint the ceiling last night. to protect the floor we rolled paper over it. so if you've checked Webbie & wondered where the floor went, no i did not pull it up in some PMS induced rage! we hope to return to a normal view this weekend with cabinets added!
Monday, April 25, 2011
Webbie does Chilli
more than one email has prompted me to post this. yes, the WebCam (Webby) is back....sort of. thanks to Brian, we have a "new" cheapie X10. but for those that like the larger upload you get on the original denacho site, you're out of luck. for some reason that ftp feed is not working. i hope to get that figured out & fixed this week. and remember it's just a photo so it uploads every minute & you'll have to F5 to see a more recent photo.
i know i know! why do i not do a live feed? cuz i'm cheap people! and i do this computer stuff all day so when i get home i like anything not involving 1's and 0's.
i goofed
as Anonymous so aptly pointed out, i never posted a picture of the final floor! well, that's because i changed my mind about 8 o'clock last night & decided to rip the whole thing up & paint it! HA! but you could picture that couldn't you? so by the time i'd read that little comment it was dark & not enough lighting to get a decent photo. and i leave too early for the lighting to be good as well. oh, and there are no lights in the kitchen right now either. yeah, we're cutting back on items like electricity & indoor plumbing to pay for this floor. so the best i can do until i get home this afternoon is this little photo i took with my phone when all the pieces were together, but not welded yet.


Sunday, April 24, 2011
burn baby burn
and here's how it all comes together! so he starts by cutting a V groove where the seams come together
 and then laying down a "bead" with the welding tool. you're looking at about 700 degrees here!
 then the excess is cut away

and when it's 2 colors, you use the predominate color for your welding rod. so say Jeremy & since he watched the videos last night i guess we have to go by what he says!

 he's got a few more seems to go, but we're almost there!


and when it's 2 colors, you use the predominate color for your welding rod. so say Jeremy & since he watched the videos last night i guess we have to go by what he says!

and this is what you get when it's all said & done

practice practice practice
so those YouTube videos last night really did pay off huh Jeremy?


now on to the real deal...
the extra mile
you know i lied yesterday. that was not the end of it. Jeremy decided to stay a little later & get the 2nd color (Oyster) down. cuts his time down for today & it's better to let the glue finish setting up for the weld today.
so watching the cuts where the 2 pieces come together was amazing. every job has the right tool right?
 This cool little tool rides the edge of the Henna & scores the Oyster. Then he comes back & cuts the Oyster away.

so watching the cuts where the 2 pieces come together was amazing. every job has the right tool right?


And that's all there is to it kids!
Saturday, April 23, 2011
First Cut
today will end with this. Jeremy got the shapes cut out for our first color, Henna. i could not be more pleased. if i bothered to shoot video, you could appreciate how he does what he does. practially cut it all out in one shot.
he started by laying out 4 sheets:
 so remember how i had to draw my design out with chalk last night? here's why. Jeremy pulled the flooring up as he rough cut the curves underneath. so he'd pull, check, cut, pull, check, cut. he'd then go back & refine the cuts so they were more smooth. all the while, cutting away the excess to reveal this curve. amazing that he could get it so close.
 and here's the curve that really started it all. i've been doodling this curve since like 4th grade. why? CUZ I KNEW THIS FLOOR WAS COMING 30-SOMETHING YEARS LATER!
 so here we are with the completed Henna cuts:

 he's now gluing the Henna down & will call it quits for the day. tomorrow we continue with the Oyster inset & the rod welding technique that sticks it all together.
he started by laying out 4 sheets:


oh, and the man responsible for this!
my name is Mud
the last step (i think) before the floor goes down is the mudding.
 Jeremy is off to lunch now so we should see some flooring install goodness soon!

Underlayment
and we're off! the first part of this process is to lay down new premium grade underlayment. so Jeremy started with a clean slate
 and the install began
 he's in the process now of nailing it all down, but here's the somewhat-finished underlayment.
 no kidding, i could stop here, stain it & be fine if it weren't for a small detail called A BUTT LOAD OF CASH I FORKED OUT FOR THE FLOORING!
to be continued throughout the day/weekend.....


to be continued throughout the day/weekend.....
final prep
thank goodness for having Good Friday off. we needed the day to get all the todo items done before the floor install started today.
so nacho removed the old sink vent since it will be moving to the island
 i patched some spots on the ceiling where the fans used to be. our ceiling is textured so i mixed good ole Pensacola beach sand (i have a 5 gallon bucket that i brought back some years ago) in with our dry wall primer paint. so i get to have a little bit of home in this house.
 more importantly, we spent the evening striking a gridline on the floor so i could draw out the design for Jeremy for today.


so nacho removed the old sink vent since it will be moving to the island


My Kitchen...for now
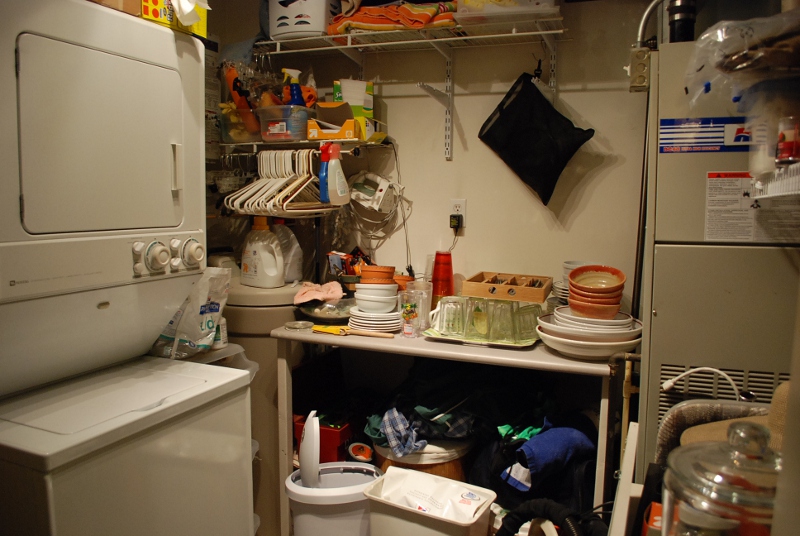
i can't possibly move on without showing you the carnage that has become my kitchen for the past 3 weeks or more. as we've moved old cabinets out & into the garage, all their contents have to go somewhere. so we stick them........
in the laundry room
 in the bathroom - which is super convenient if you'd like a latte while you drop a load!
 in the living room - easy for getting to those snacks during a movie
 there are some minor items in the garage & i'm using that as my litmus test for how much i really need most of the crap that was in the cabinets anyway. funny how something like this will teach you that out of the hundreds of things you have in a kitchen , you really only use like 5.
in the laundry room


Sunday, April 17, 2011
lots of catch up
where the hell have i been? oh yeah, let's see after the last post i had to head home to the Motherland because my 100-year old grand ma passed away, then i was sick the entire next week with some possum virus, and this week it's all been about catch up, no mustard, just ketchup! so here's what's happened since eons ago! oh, and to be fair most of these pics were taken mid-March but i'm always late posting so big whoop!
that Old Header between the living & dining room that used to look like this:

now looks like this:

it's funny cuz going up with the header actually makes the opening look wider. you can see we put a knee wall in to break up the space a little more for what will be the dining area. maybe it's the knee wall that makes it all look wider. i don't know, i'm just a girl & math is hard. and here's a pic of that dining corner:

the knee wall will also allow us to do something with that corner in the living room. before you couldn't really put a chair there because 1 leg would hang out over the steps - go back to the first pic & you'll see what i mean. I have to admit, it hurt to pull out the curved step that Nacho & I worked so hard to make, but it was worth the sacrifice. and speaking of stairs, here are the new ones the guys built:

we may be a little out there with this idea (okay, the whole kitchen cuz who starts their kitchen remodel off with a dog food drawer?), but we plan to make the area you see under the stairs, as well as that little pedestal thingy in the corner, into storage. I've seen some really cool configs where people have done this & the fronts of the stairs are just drawer fronts. yeah, crazy, but when you only have about 1,000 square feet of total living space, call me & tell me how creative you had to get for all your crap! there is not a square inch of this remodel that has not been considered for double duty where possible.
but it's not been all rainbows & unicorns, this adventure. no sir. with every remodel, some paint must be spilled. and with that said, i am sad to report that my beloved flooring is gone! gone! did you hear that? the sound of my spirit being broken! nacho started pulling that up a couple weeks ago. i don't even recall when, i have repressed it. as of today, all of it is gone. it is the single cruelest thing ever done to me. i don't have the strength to post that post-mortem photo. let's just remember her the way she was in happier times...

i'll miss you Wavey! and revenge will be mine!
Subscribe to:
Posts (Atom)